
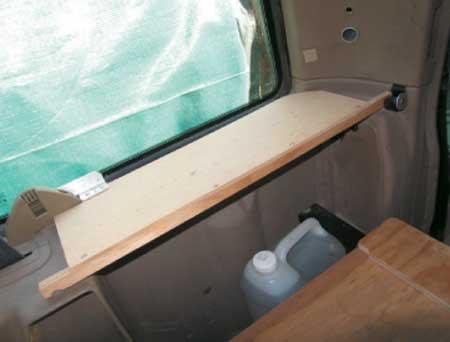
| When building the Discobunk the side-facing rearmost seats were removed leaving useful cavities. Trim panels behind them were also removed to access fasteners and it became obvious that they hid some usable space. The bottom corners were angled to a V-shape, one necessary for the mudguard, the other purely cosmetic. Further forward a bulge above the ‘guard and behind the door was also hollow. Harvesting these spaces seemed worthwhile. The panels are held by push-in studs and screws. First the corner speakers were unscrewed, unplugged and their panels lifted out. Screws hold the cargo blind hooks and the rear of the panels and one of the screws were removed from the D-shaped blind catch by the windows. Next pop out the studs to free the panels – and probably a good time to give them a good scrub. I particularly wanted to reclaim the rear corners so items could sit flat on the floor. I’m no upholsterer or car trimmer but it didn’t look too hard. The fibre board backing needed trimming with enough vinyl left to overlap an insert. It was never going to look a silk purse being a well-used camping and work vehicle so fussy was not on the list. Pencil lines marked the first cuts. These went right through and left about 2cm of vinyl for the join, but that was barely enough - I’d suggest at least 3cm for good gluing. It cut easily through with a craft knife, then the vinyl was peeled back and the board cut away. A triangular patch from 3mm MDF was cut to fit and glued and clamped in place. Any contact glue should suit. As my ongoing plan includes a small cupboard fitted to the seat space at one side I removed the whole back part of that trim. This gained some depth and also spare vinyl for trimming. There were small slits in the vinyl where the seat brackets and belts came through that looked untidy so I cut small patches from fibre off-cuts and glued them behind to minimise them. With the bed in place they are unseen anyway. The cavity left is an excellent storage space and perfectly fits a 4-litre water container with room to spare for a drink bottle or flask. The bulges I mentioned earlier run almost vertically behind the rear seat latches. They are empty and have an angled face toward the top. I cut out these upper faces and folded the vinyl inside to make handy pockets. They are quite deep with the mudguard carpet at the bottom. As above cut the hole 3cm smaller all around, slit the corners, peel the vinyl forward then trim away the backing. Glue and clamp the vinyl folded inside ‘til dry. Cut some MDF as a backing plate to close in the rear of the cavity, glue it in place then tape the joins with wide masking tape, duct tape or book binding tape (I found that best) for extra strength. If building a sleeping platform or other structure now’s the time to measure up the positions of the useful threaded holes in the body side panels and floor. There’s plenty of them. Some are m8, some larger, same thread as seat belts. For the Discobunk I used one big one on the side and two in the floor for the rear bracket. The seat belt size bolts can be got from seat belt vendors or wreckers (who are not allowed to sell used belts but getting bolts for this should be legal). The top pair of seat brackets each side (just below the windows) are best left in place as, with their pivot screws refitted, make good tie-down points. |
They are handy to hook stretchies to, or light ratchet straps, though you’d maybe not want to crank those up too tight. The side panels go back in easily - push into place, replace the push pins and screws, fit the speaker panels, connect the speaker wires observing polarity, then screw the speakers back in place. Don’t screw them too tight or the bezels may crack. |