The first three questions asked of 4WD owners: “Have you been stuck yet?” “When are you getting a winch?” “Have you used the winch?” Noble thoughts, but some of the most common immobilisations happen where a winch cannot be used.
Get hung on the centre of a typical rutted track where there are no big trees about, hit a soft spot and sink to the axles in an open area of sand, mud or pea-gravel, or hang on a rock in the middle of a river crossing and you’ll be there a while.
You’re on your own with whatever tools are in your truck. Your nice fat rope or strop is little use without another vehicle to hook it to.
First Aid really begins even earlier. You should check the route beforehand by walking it but we all make mistakes.
Assess the problem thoroughly. You may need to feel around under the vehicle or poke underneath with a stick to find which parts are grounded. Be careful not to damage brake pipes or wiring when doing this.
Do any of the wheels have traction? Are the ‘hubs in’? Is 4WD selected? Are you in low range? Are any diff locks selected? What are your tyre pressures? Do you have a flattie? Is your traction control on the best setting? Is the vehicle damaged? If it’s dark or nearly so, do you have a torch?
Decide whether you should continue forward or would backward be easier or shorter, as it often is?
Assess what gear you have and what else is available to use. Things like sticks, logs and rocks, or other items like waratahs, wire, ‘corry’ iron or even parts from a dumped car can all be helpful.
Your spare wheel may be a valuable asset. A shovel certainly will be. In almost all situations lowering tyre pressures or fitting snow chains will help. Drop the pressure to 25psi or perhaps 20psi. Even 15psi is usable in extreme cases but take care to not push the tyre off its rim when turning.
Self-recovery takes time and quite a bit of energy, so warn passengers to be patient and put them to work. While you’re digging and jacking they could be rounding up useful materials, or vice versa.
A vehicle becomes mobile when enough power can be applied to the ground to overcome any resistance. If the tyres cannot grip or if drag on the chassis is too great, it won’t move. Sometimes a 4WD will stop moving simply because one or two wheels are off the ground and the chassis isn’t snagged at all.
This is usually when diagonally opposite wheels have lifted because the suspension does not have enough travel to conform to the terrain and is termed ‘cross-axled’. It’s a common situation and engaging a diff lock will often enable the vehicle to be driven out.
If no diff locks are fitted try gently applying the handbrake as drive is applied or get the wheels turning slowly and push the brake pedal with your left foot. Feed a little more throttle as this is done, to prevent the engine stalling.
Using the brake loads up the wheels that have no traction so that, hopefully, enough torque will be transferred to those with traction and the vehicle will move. It often works, so long as the vehicle is not snagged on something. It’s always worth a try and is a good technique to practice before you need it.
If the vehicle will move a short distance, in either direction, try ‘rocking’ it out. This means to go gently but rapidly back and forth over the distance available using quick gear and direction changes to keep the vehicle moving and use the vehicle’s natural ‘bounce’ to elongate the movement. Before doing this use your shovel to lessen any lumps that are blocking the wheels or snagging the chassis.
If it’s pea-gravel you are stuck in, so long as the chassis or suspension is not touching, try moving as gently as possible with the wheels barely turning. Slower is better and reducing tyre pressures drastically is a great help. If the wheels are digging down - stop immediately. The vehicle will need to be raised and a mat of branches or stones laid to drive on.
On slick mud or wet grass, with all four wheels spinning when the vehicle isn’t snagged on anything, then the problem is simply lack of traction caused by the tyre treads being clogged. Sometimes this can be overcome by generating lots of wheelspin to throw the treads clear.
Waggle the steering from side to side at the same time (this can work in ruts too). However, don’t allow the vehicle to dig down and get more seriously stuck. Also beware of it suddenly gripping and shooting off sideways! Heading downhill will help.
If you are in a hollow and unable to climb out try an extension of the rocking technique – go downhill fast to get as far up the other side as possible then quickly back the other way to hopefully get further each time. Laying branches or sticks across the tracks will help as will removing any high snags.
If that doesn’t help then the procedure is the same as for when the vehicle is snagged or grounded. It must be lifted and have packing put beneath the wheels. This packing has to perform two duties – it must support and lift the vehicle clear of any drag and also supply enough tyre grip to move the vehicle.
Whatever material is used it must remain in place as drive is applied and not just roll or throw out of the way. For instance, a log dropped into a rut may look great and lift the vehicle well but often, as soon as you try to drive, it will roll and drop the wheel off and your efforts will have been in vain.
Logs are excellent fillers but need stones or sticks packed alongside to prevent them moving and to fill any gaps. Almost anything of substance will do to fill ruts.
Rocks and stones are best, with shattered types better than rounded river or beach stones, as they lock together better and have more grip. Use a range of sizes with some dirt added to aid locking. Sticks work well and are also improved with varied sizes and stones added, as above. Branches with leaves laid on top of fill, will also aid traction.
Raising the vehicle obviously requires a jack. The standard issue vehicle jack will do, no matter what sort it is, though it may not be the best option. To lift the vehicle sufficiently it will usually need two lifts to get enough height. So, it will have to be propped up while the jack is repositioned on packers for a second lift.
Jacks that lift the body aren’t as good because it takes lots of lifting before the wheels lift and then the truck may be unstable when raised. At least they tend to have a greater stroke than the jacks designed to lift under an axle.
Propping may be achieved with rocks or logs, pyramids of stones or tidy rectangular structures of crossed sticks under suitable parts of the body or suspension. Be careful not to use sensitive areas with pipes or steering components – intercoolers, for instance, are not jack proof.
Packing under a jack needs to be solid due to the jack’s small footprint and the need for stability. In some situations a hole must be dug to get the jack low to fit beneath the vehicle.
A handy dodge, when the body is grounded but a wheel is on a hard surface, is to jack the body up then jam a stone or chunk of timber between the suspension and its bump stops to prevent the suspension compressing.
This takes a good deal of care and it may need to be done at every corner but it increases ground clearance. These packers must be removed once clear.
You’ll note a requirement for packers, be they for the jack, the body or the ruts. This is where an axe (preferably a big one) or a bow saw comes in handy.
Axes are useful for splitting rocks, cutting big branches, chopping a stump from under the vehicle, removing fallen trees or driving ground anchors.
Bow saws are terrific for cutting branches and getting useful square ends on them, very handy if making packers. Carrying chunks of 100x50 timber can save a lot of time too.
An oldie but goldie that works on some vehicles is to wrap rope around the tyre and rim as substitute for chains. It works very well but needs enough room between disc brake calipers and the wheel rim to allow the rope to pass as the wheel turns.
The more expensive the vehicle and the bigger its disc brakes the less likely it will work but many 4WDs have drum brakes at the rear so it’s more likely to work there. It needs to be done to both wheels of an axle or to all four. Again, care must be taken to avoid damage to brake-pipes.
Stopping to think about a problem helps when all seems lost. I once unstuck a rear wheel drive car by converting it to 4WD in half metre increments. The ‘rope round the back wheels’ trick had failed so I ran a rope down each side of the car between the front and rear wheels.
A rope ran tightly from the 3 o’clock point of the right rear wheel to 4 o’clock on the front wheel so, when the rear turned, it pulled the front with it, for about half a turn. A few repeats of that had the car out of the mud, though I was dirtier than it was.
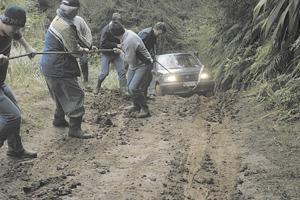
Another trick is the ‘Armstrong’ method. All it requires is a good long rope or tow strap and a bunch of willing helpers. Attach the rope to the most hopeful end of the vehicle and get everyone to pull and rock on the rope, while you attempt to drive out. It’s amazing how well it works.
Gear to carry? Well, the jack and handle should be there, along with a proper shovel or spade. Folding spade tools have very limited use. They’re just not long enough to dig away a ridge from underneath a stuck truck without the operator having to get under there as well. Sometimes you can only access one side, so you need the full length of a shovel handle.
An axe comes next. If you are likely to have to repair a track, then toss in a pick or grubber. A big axe can substitute for a pick on hard ground but will need resharpening afterward.
Take chains, if heading for deep wet ruts or soft going and nothing beats a hi-lift jack for solo recovery, providing the vehicle is equipped for it. Few new trucks have suitable jacking points but most bull bars have mounts and some older vehicles are easily modified.
A hi-lift jack can also be used as a winch with a chain-based kit. A standard technique with a hi-lift is to jack one end of the vehicle very high then let it flop sideways, off the jack. Then repeat at the other end of the vehicle to heave it out of the ruts. It takes care to prevent the moving hi-lift beam scratching the vehicle or catching the operators hand or fingers as it moves.
A vehicle can even be turned around using this method. That can be useful when imprisoned in ruts that allow movement for quite a distance but won’t allow you to get out unless the vehicle can face the other way.
If there’s room at the track edge you may be able to jack the vehicle around ninety degrees and drive it onto a clear patch. From there you can escape by straddling one rut or just get enough speed up to blast your way out. It is possible to get a vehicle out of ruts by digging curved wheel channels, to guide the wheels up and out.
When using hi-lifts keep others clear and never get under a vehicle raised by any type of jack. If trying to unstick a vehicle by rocking with people pushing, be careful not to run over anyone. It’s not uncommon for a helper to slip and fall into a rut, where an unaware driver can reverse over them.
People don’t always realise that the vehicle may suddenly change direction, so are unprepared for it. I’ve seen a vehicle run two chain-clad wheels over someone. The victim couldn’t yell ‘cos his face was buried in the mud.
Don’t forget your spare wheel. Use it to prop the vehicle, fill a hole, support a jack or give a hard base in soft stuff. Take care with a shiny alloy not to damage it by wheel-spinning on it. Use it under a jack with a protective board or folded sack.
I did a lot of exploring in Minis, when younger, and carried two spare wheels. Many times we got out by laying a spare under each front wheel then blasting off them back to hard stuff.
Being stuck on your own always involves some sweat. Lateral thinking and useful gear always helps to reduce it.
Once you’re out keep your speed down until you re-inflate the tyres, as handling will be compromised and the tyres could be damaged.


