DAVID COXON WANTED TO GO OFF-ROAD BUT DIDN’T WANT A ‘TUFF TRUCK’. HERE’S WHAT HE DID TO MAKE HIS PRADO ‘ADVENTURE WORTHY’
Setting Up My Vehicle:
Part 1. The Essentials
About four years ago when I was looking to replace my car I decided I wanted a 4WD “so I could go places”.
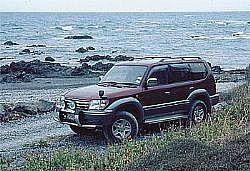
After much searching I chose a Japanese import 1996 Toyota Prado Diesel. As well as my daily drive, I planned to use this for back-roading and exploring, but because I had no real knowledge of the 4WD clubs at that time I had not even considered joining a club and getting on more adventurous trips.
Then I picked up a copy of the New Zealand 4WD magazine at an airport bookshop. After reading it from cover to cover I contacted a local club and arranged to visit.
I found that the club ran trips at all levels from easy to hard yakka. I now had a decision to make, should I get a rougher and tougher truck or stick with the Prado and toughen it up a bit?
My first question to myself was “What sort of trips did I want to do?”
After doing some serious thinking I decided that what I really liked was going places, not conquering obstacles.
For me “going places” meant not just on local club trips but also being able to go further afield in relative comfort then do some off-roading when I got there, as for example on the recent Reader’s Trip on the Central Plateau.
Although it is fun to make it through some more challenging terrain, picks and shovels were invented before raised suspension and diff lockers, and I am quite happy to do a bit of road works rather than have the expense of panel damage and breakages.
After doing a couple of easy trips and some training to meet the club’s membership requirements, I decided that I was very impressed with how capable the Prado was in its standard form and that the best option for me was to progressively carry out a number of minor and acceptably inexpensive enhancements that would make it more suitable off-road without compromising the on-road capability or looks.
Coincidently the magazine had just finished the highly successful “Project Prado” series, and this inspired me as to what could be done – although my budget was much more limited.
Although it would probably be cheaper to get a fully set-up tough vehicle, such a vehicle would probably not meet my desire for easy long distance travelling as well as the Prado does, and would not be as much fun as setting things up for myself.
Basic recovery gear
The first step was to sort out the essential gear required to be carried on all club trips.
The spade/shovel, first aid kit, vehicle jack, base-board for the jack and a simple tool kit were easy enough, since I already had those. The fire extinguisher was a little more complex since a trip to the local hardware store showed how many options were available.
I ended up getting a 1 kg dry powder extinguisher, and soon after got a second one when a tag-along trip required a minimum of 2 kg of extinguisher capability. This meant I could have one in front of the driver’s seat and one mounted just inside the rear door. A word of warning at this point is that some of the cheap extinguishers are plastic bodied rather than metal.
While these are fine when new, I have seen examples where the plastic has degraded over time making the extinguisher potentially unsafe.
The last item was a suitable stretchy recovery strop.
As most of the gear I saw included a flat webbing strop, that is what I went for as it is easier to store than a round, rope-like one. I also went for the 6 metre length rather than the 9 metre version. Both have their place although the 9 metre version is probably more popular.
A huge amount has been written on the use of strops and their performance, and a quick Internet search will give you as much extra information as you could ever want.
Hooks
The final requirement I had to meet for the club was to have recovery hooks fitted.
Initially I used the factory-fitted recovery hook at the front and added a rated hook to the removable tongue for the tow ball at the back.
This made the hook very accessible and also gave it a very strong mount since it is connected to both chassis rails. It also meant that I could remove the tongue for everyday use and save my shins from damage. I use the tow ball so rarely that rather than getting a separate tongue, I just swap the hook for the ball when necessary.
On advice from one of the club members I got rid of the Toyota hook at the front and put a rated one on each side.
Having air bags mean these have to sit back on the chassis behind the air bag compliant crumple zone and are a bit hard to get to, but having one on each side makes it more likely that I will be able to get to one of them.
I now had the vehicle set up for easier club and tag-along trips, while still retaining the same on-road appearance as when I bought it.
In future articles I will look at the extra gear I have bought, and changes I have made to give me better off-road capability, while still having a quite standard looking vehicle for everyday use. *