It’s been a while since we last updated Project 12K, probably so long some of you might have even forgotten we still had a budget project Jeep Cherokee.
You can be forgiven for that too, as the Cherokee languished in the Adrenalin Publishing warehouse for several months, only coming out for its six-monthly WoF and covering six kms within that time.
The reason was an occasional noise coming from the front end initially off-road, only to become a whine and slight vibration on road. The diff seal was weeping so it was overdue for some workshop time.
Refresher course
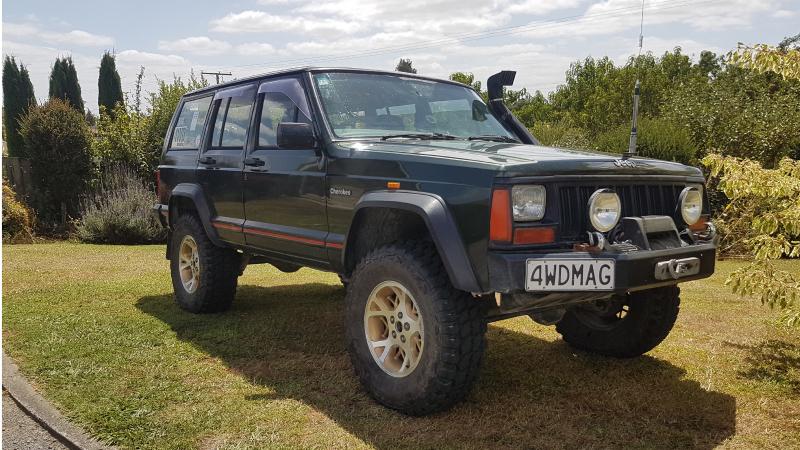
To refresh your memories, Project 12K is a 1995 Jeep Cherokee originally purchased in 2007 for $2,500 as the basis of a budget project to set it up for off road use, originally for $8,000 including purchase price. Proving successful, we liked the capability of the lightweight Cherokee off-road, and five or six years later – seeking another project – it was renamed Project 12K to see what could be achieved with a slightly higher budget.
Briefly, Project $12K is set up with a close to 12 cm (4 ½ inch) short arm suspension lift kit from Iron Rock consisting of new springs front and rear, rear extended spring shackles, Doetsch shocks, and adjustable heavy duty top and lower front arms, along with an adjustable (rear) Panhard rod with a revised and heavy duty chassis mount.
The standard 15-inch steel rims were also ditched at this time, albeit for second hand 16-inch Jeep Grand Cherokee alloy rims which were fitted with 265x75x16 Achillies Desert Hawke XMT tyres.
With the revised set-up coming within budget, we have been very happy with the vehicle both on and off-road.
To the workshop
Due to sitting with lack of use, the battery finally died, so needed replacing. Repco batteries are made by Century Yuasa Batteries which have a good reputation and have been used successfully by us in the past, so we opted for a replacement from Repco. Due to limited space within the battery box we stayed with a standard sized battery but with the largest cold cranking amps rating in the size.
Attention then turned to the problem with the front end; giving the driveline a thorough check over and replace the leaking diff seals and axle universal joints. Up on axle stands the first step was to remove the wheels. Brake calipers were unbolted and tied up out of the way without disconnecting or damaging the brake lines, followed by the steering arms from the hubs. As it is only three bolts per hub, we opted to remove the axle and hub as one unit rather than fight with the 36mm axle nut which is torqued to some significant setting.
The universal joints were inspected and seemed okay, but we would be replacing them anyway. We then drained the old oil from diff and unbolted the front cover to allow removal of the diff centre and access to the diff seals.
For parts we use Greg Hopkins at Off Road Specialities and as well as ordering new seals and UJs for the axles, we also got a pair of Alloy USA alloy axle tube seals to stop the water and muck getting into the axle tube. The standard part is a two-piece plastic unit that clipped on to the axle but did little to stop dirt getting into the axle tube and ultimately damaging the inner diff seals.
Do as I say dept.
When we cleaned out the axle tube after removing the diff seals it was surprising how much dirt and sand was actually in there. Using a long pipe and rags we pushed the dirt out. In hindsight we should have worked from inside out as we finished up pushing all the dirt into the diff head housing and had to thoroughly clean that afterwards making additional work for ourselves.
Once cleaned up, the new diff seals were fitted using a spacer and small shaft through from the opposite side.
Turning our attention to the axles and with the assistance of Steve Whitton from 4WD Fiberglass – and a fellow Jeep owner of longstanding – the old UJs were pressed out using various sockets and the hydraulic press. A little awkward with hubs still on the end but with two of us it wasn’t a bother. While on the bench the axles were cleaned and sanded to remove any surface rust, especially where they will sit within the new axle tube seals.
With everything cleaned and ready for reassembly first up was the alloy axle tube seals. The instructions suggest a small amount of silicone around the edge before putting them into the tube. While this was setting, it was back in with the diff head and torque up the bolts. This followed with the axles and hubs, brake rotors and calipers. The brake pads were good so I just gave them a quick clean and scuff-up before fitting. The diff was then filled with fresh oil.
But what about the whine!
Throughout, nothing was showing up as to have been the cause of the initial problem, so attention was moved to the front driveshaft. We knew the slip splines were worn due to slop unless filled regular with grease so we set about removing and inspecting properly however this simple job proved problematic. The bolts are small multi-point items and several of the ones at the transfer case end had previously been ‘butchered’ and nothing in the spanner and small socket collection would work. I finally resorted to a small cold chisel and was able to tap on the flange to get them moving.
Once the drive shaft was off, the problem was plain to see; the double cardan universal joints at the transfer case end was seized with buggered UJs. A replacement drive shaft would be required. It seemed to be a common problem with these Cherokees as finding a good second-hand replacement proved difficult and the UJs in the double cardan are not greaseable and are prone to failing.
Even our favourite source of Jeep parts, the efficient Greg at Off Road Specialities was unable to help, either second hand or new.
An internet search soon had us at a website ‘Jeep Cherokee Parts NZ’ (also Jeep Parts NZ) that list wrecking Cherokees and was west Auckland based. Email contact made and Hamish came back confirming he had one at $185.00 plus freight. When we agreed and asked for two or three bolts to replace the damaged ones the invoice came in at $230.00. The price had gone to $200 with the bolts plus GST. No freight as we intended to pick up. Oh well we paid as we desperately needed the drive shaft.
Then the problems and delays started... with subsequent difficulties in making contact to arrange pick up and several excuses, including he was in process of moving to an even more remote location out beyond Paremoremo. After five or six weeks it was time for action and contact was finally made with a demand to supply or refund.
Agreeing to supply, a friend made the long journey out there to pick it up and then drove south for me to meet him half way (thanks very much Norm.) And whilst we got the drive shaft, we never got the bolts, and despite follow-up requests have never received them.
Once the drive shaft was eventually received it was carefully inspected and deemed a good one but it was given a clean-up and a coat of black paint before fitting. As Murphy’s Law would have it, of course, while the paint was drying, a non-running 1998 Cherokee parts vehicle I had been chasing for several months finally arrived on site. At least I was able to replace the damaged driveshaft bolts.
Full service resumes
While waiting for the long anticipated driveshaft, Project 12K was given a full service. Oil and filter changed, engine bay degreased to try and find where an oil leak was and the cooling system flushed. The top radiator hose had a small weep with my initial thinking that it was the top hose.
It turned out, however, to be a “spring clamp type” (constant tension clamp) hose clip that had split and broken. We replaced the top hose anyway and fitted new worm screw type hose clips although some tend to class this type as inferior. The best is the racing T-clamp but they are more expensive and this is a budget vehicle after all.
As a final check over before taking it in for a long overdue WoF, the right rear door latch seemed to fail and wouldn’t allow the door to be opened from the outside. The door card was removed and revealed that the door water splash lining was still as fitted at the factory, unusual on older vehicles.
Attempts were made to clean the latch to no avail so it was removed. Why it wasn’t working eluded me but apparently they are another common fault with Cherokees. So it was out to the acquired 1998 model parts vehicle, but typically the doors and latches are totally different and not interchangeable. Once again the call went out to Off Road Specialities and a replacement was received the next day by courier.
With a new warrant of fitness Project 12K was ready to hit the tracks again for the 2019-2020 summer and 4WD safari events.
Next month the routine maintenance and repairs continue.