Owning an older vehicle often means more regular maintenance issues, especially one that is over 25 years old, and Project 12K is no different. Custodian Ashley Lucas explains.
The key advantage, of course, in owning a 4WD like ‘our’ Cherokee, is that it is old school motoring at its best – with basic engine and systems allowing DIY workshop time.
After use over the summer and once again parked up due to the first Covid lockdown, winter 2020 was ideal to attend to a couple of issues. One was a slight coolant leak from the heater hose into the head. Again, the clamp was the spring clamp type so it would be replaced, especially as the heater hoses have to be disconnected to aid removal of the rocker or tappet cover.
The oil leak from around the engine was still there so yet another degrease and water blast underneath and it was considered it was coming from higher up at the back of the engine and put down to a leaky tappet or rocker cover gasket.
A new gasket was ordered, and the rocker cover was eventually removed after battling with two bolts at the rear that are almost impossible to see and harder to get a socket on to. Patience and a swivel universal joint on the socket was key for this.
Immediately noticeable was the fact that the new gasket was significantly different to the wafer thing just removed. Seems that the gasket was updated with a revised cover for models after 1996 with additional seals around the bolts but the gasket also fitted earlier models.
A clean slate
The cover was degreased and cleaned up, including cleaning out the breather and the head surface was also cleaned and inspected. I did consider briefly updating the cover with the later version from the parts vehicle but due to having to remove heater hoses, the difficult bolt access at rear and the inclement weather I didn’t bother.
Also, the parts vehicle one would have needed painting, which would have taken time that I didn’t have available at the, er, time.
While the heater hoses were disconnected, I decided to flush out the coolant system again, especially as it had got a little warmer than normal driving Baylys Beach and Pouto on the Kauri Coast Safari earlier in the year. In our ownership we had already replaced both the water pump and radiator.
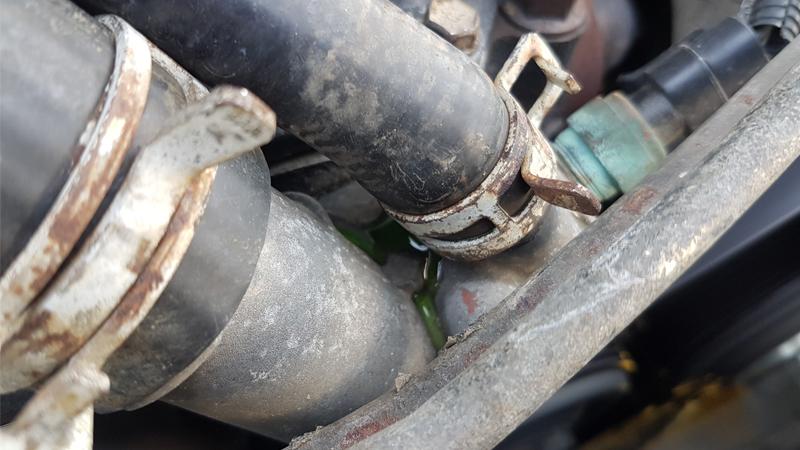
Seems I might have dislodged some dirt in doing so, however, as it was once again WoF time (with the first 4WD safari event for 2020/2021 looming up fast) and the mechanic commented that it was leaking coolant as it dripped clean green coolant while he was underneath; it was coming from the water pump.
However, our WoF sheet was marked as a fail due to the handbrake and it wasn’t just adjustment required so back to the workshop the Cherokee went.
First it was the rear brake problem and the rear jacked up and placed on axle stands and wheels removed along with brake drums. The Cherokee still used drum brakes on the rear which also incorporated the handbrake and even though we had previously replaced the brake shoes I was some what surprised to find the right rear shoes totally devoid of any linings at all. Unfortunately, it had also started to score the drum, but the left side was okay.
A call to Greg at Off Road Specialities, the Jeep parts specialists, had new brake shoes coming overnight but he didn’t have a water pump in stock. Meantime I set to photographing the brake set up for reference on reassembly, then dismantled and cleaned all the parts with brake cleaner; Genuine Land Rover branded brake cleaner at that!
I also went out and took the right-hand brake drum off the parts vehicle only to find that too was slightly scored – so tried the other side which was in good condition. Back inside both drums were given a good wire brush and clean before painting the exterior with a rust converter to provide some protection in the adverse conditions that the Jeep is occasionally subjected to from time to time. Maybe that should be quite often. New shoes fitted and the hub surfaces were given a coat of copper grease before final assembly and adjustment.
Access (not quite) all areas!
Attention turned to the water pump, which is probably one of the worst jobs to do on the Cherokee. The pump is only held on by four bolts, but it is a mission to get to. The air filter box is removed to allow better access then the fan bolts are undone and the fan and shroud are moved out of the way.
Next is the power steer pump that has to be unbolted and lifted out of the way but to get to the last bottom bracket bolt, the air conditioning compressor must be removed. Then and only then can you access the water pump bolts.
The replacement water pump was obtained from the local Repco store as it was on special and in stock and I had it and the old pump together on a box prior to fitting when interrupted by a couple of mates who called in for something else. It was Peter who commented that the water pumps weren’t identical; the pulley flange centre was a different size. The Jeep has two variants of the water pump, the difference being the flange for the pulley. They had checked the vehicle registration details to ensure the right one and commented there were two types so, bugger, as it now meant a trip back into town but on the plus side it would have been so much worse if fitted and it was only when trying to fit the pulley that the error was noticed.
Murphy’s Law at work again, of course the correct one wasn’t on ‘special’ and cost a lot more.
While the water pump was off, I also took the opportunity to replace the bottom radiator hose as it curves around under the a/c compressor to the water pump and would be a pain to replace any other time.
With a fresh WoF the Jeep was handed back in time for another team member who planned to go on a weekend club trip over Labour weekend.
Back to the workshop
Checking the social media pages over the weekend I soon realised I would be getting a call to advise that Project 12K was broken and sure enough I did. I also got to view the video of when it was thought that damage happened.
Letting a novice four-wheeler behind the wheel of Project 12K ended up with a bent front diff housing due to several factors; failing to read the terrain ahead it was powered into exposed tree roots that had the vehicle leaping into the air with a loud bang.
The result was that the right front wheel was further back into the wheel arch and actually touching when turning so it was a trip to Auckland to trailer the Jeep back to the shed.
Closer inspection showed that the lower suspension arm mount on the axle housing was badly twisted and had started to tear away from the housing. The top arm had also touched the sump but fortunately didn’t puncture it. The right-hand shock had contacted the chassis and was slightly dented and the shock boot torn, and the wheel arch was bent and pulled out of its mounts. There was a lot of strain on the lower arm bushes, but the heavy duty arm itself did not appear bent.
They always say the alloy rims are not strong and tough enough off road and that steel are better and can be knocked back into shape on the tracks. The genuine Jeep alloy rims fitted to Project 12K survived the hard impact without any damage whatsoever, proving alloy rims can be as tough, if not tougher that some steel rims.
With a donor parts vehicle outside it was planned to swap over the complete housing but use the axles and hubs from Project 12K because they were in good condition with replacement UJ’s. The donor diff had surface rust so a clean up and paint would be required once out of the vehicle.
I had the complete diff out and on the trailer when it was noticed it seemed to have a lot of ‘play’ inside the diff. And when I whipped off the front cover you could see why; the diff gears were broken and smashed up inside.
Bugger! And a new plan ... to sand blast the diff housing, strip broken diff head and pinion and fit the diff head and pinion from Project 12K.
Steve Whitton had contacts that would do the sand blasting and someone knowledgeable who would swap the diff heads over and set it up correctly at his workshop in Hamilton, so the two housings were taken there.
In the meantime, a request went into Off Road Specialities once again for more parts; new diff seals again, a shock absorber boot and replacement bump stops as the right-hand side was damaged and both were crumbling from age.
I then set to and removed the lower arms to check then against each other to see if there was any damage or bends in the right-hand side. Fortunately, it was fine and had suffered no damage confirming that they are indeed heavy duty. The new shock boot was fitted, as were the new orange bump stops.
I also sorted out the misshaped plastic wheel arches with a hot air gun and fitting the missing clips and screws to hold then in place.
Once the housing was sandblasted, I went over the next day and etched primed and then spray painted the housing ready for ‘Doc’ the diff guy, to assemble the following week. I had hoped to get it back by Friday to get the Jeep back together for an upcoming trip, but ‘Doc’ only works until lunchtime so the job was eventually finished on the following Monday.
The diff was fitted back under the Jeep and everything pretty much lined up as it should. The alloy tube seals were swapped over along with the hubs and axles. The diff was filled with oil and ball joints greased before finally fitting wheels and lowering the whole ‘kit ‘n kaboodle’ off the axle stands.
A test drive seemed to indicate everything was good but I dropped if off for a wheel alignment anyway.
It was once again ready for more adventures and on the next outing the front wheels were touching the front guard stays both sides. It was only the right-hand side previously on extreme articulation and full lock but now both sides. I think that the front springs have possibly sagged a bit but haven’t looked out the original measurements to confirm but to solve the hitting, the stays have been removed without any adverse effects.
More recently the left rear shock top mount broke while off road so the shock was removed for the trip home. Initially I thought one of the bolts had fallen out but when back in the shed closer inspection had both bolts still in place, with one side still holding the broken part of the bracket. It seemed one of the bolts had part of the flange broken off and must of allowed some movement.
Fortunately, we had a new bracket stashed away having received two sets when we originally got the suspension kit for some reason and the parts vehicle provided a good replacement bolt with flange. Proved to be an easy fix in the end.
And so, Project 12K has just gone through another six-monthly WoF inspection with no faults and has a fresh sticker ready for its next adventure. If you see us out there do stop and say G’day.