Looking for a slightly unusual solution to a problem, David Coxon decided to go down the DIY route.
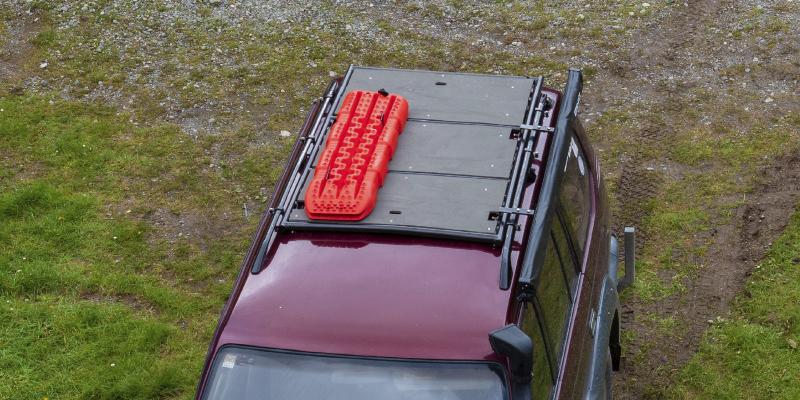
he problem in question was that I needed a platform on the roof of the car that I could stand on to take photographs over the roadside vegetation when on my touring trips. The platform would also need to be able to carry building supplies for DIY projects, mount an awning for camping trips, and carry my TRED recovery boards or a roof storage bag.
However… the existing height of the vehicle with the slight lift from the Old Man Emu suspension meant that on mud tyres I only had a few millimetres clearance under my garage door, not enough in other words for the sort of conventionally-mounted roof racks you can buy ‘off-the-shelf’ these days.
My bright design idea was to have a platform hanging inside the roof rails, so that it was no higher than the top of the rails, and to include brackets to take a removable awning. For the sheer fun of doing so, I decided to make it myself.
Five-stage process
After weeks of serious design – that is walking around in a daze talking to myself – the build fell into five sections:
•
The roof platform frame, made from 38mm steel pipe for the sides and possibly 25mm pipe for the cross bars.
•
The mounting brackets to attach to the factory roof rails and hold the frame just above the roof, made from 25mm x three mm steel bar.
•
The flooring, able to support the weight of me walking on it, and also able provide flexible attachment points for the storage bag or any materials being carried.
•
Awning brackets. The awning needed to be easily removable since if it was mounted low enough not to hit the garage door, it would also be low enough to stop the car doors opening.
•
Final finishing and painting.
Careful measurement showed that the roof rails were curved from front to back to follow the curved roof line. The two rails were also tapered slightly, being further apart at the back than the front. Rather than trying to accurately measure everything, the easiest approach was to attach the two sides of the frame to the rails then cut the cross bars, and fit and tack weld them before removing the frame and fully welding everything.
The original idea was to have each hanger made from a single length of 25mm x three mm steel bar bent into a distorted ‘S’ hooking over the roof rail and holding the pipe. After bending this out of a very light bit of strapping to get the basic shape I realised that, with my current bending skills, it would be too difficult to manufacture six identical copies. The method I used was to bend a ’finger’ to the shape of the cross-section of the roof rail, and a ‘cradle’ to go under the pipe, then weld them together.
After struggling to finally make all six brackets nearly identical, I discovered a “partly cut, bend, and weld” technique on YouTube that would have made the job much easier and more accurate. I also welded a ‘tongue’ out from the finger, and made a locking piece to go across the bottom of the rail, clipping into the bracket at one side and bolting to the tongue to make a clamping mechanism (see photo).
I now had the two pieces of 38mm pipe, cut to the required length, with three mounting brackets welded to each pipe. This was highly satisfying for me, but the visual progress certainly did not reflect the time and detailed work involved.
While I had hoped to be able to keep the pipes straight, I ended up needing to bend them to match the aesthetics of the roof line, so I called in my friend and travelling companion Ashley to help out. Our first plan was to rest each pipe on two blocks and use a bottle jack against the bottom of the tow bar to bend it down. However, all this did was lift the car up!
Plan B
Plan B involved increasing the vehicle weight by putting one end of the pipe under my tow bar, and the other end under Ashley’s tow bar and using my hi-lift jack to provide the lift. This turned out to be the perfect tool as it had enough lift to overcome the suspension travel and was easy enough to move to make several lifts in different places.
Slowly but surely we got both side bars bent to follow the roof line enough to give the right appearance, and after some struggling we managed to get them clamped and braced into their final positions.
The rear 38mm cross-bar was then cut to size using a 38mm hole saw to provide the correct profile on the ends of the cross-bar. It slipped nearly perfectly into place ready for tack-welding, a positive start.
The front cross-bar was a little harder as it ended up touching the roof in the centre, but a little bending soon saw another good fit. Looking at using a third 38mm pipe as the middle cross-bar we realised that it would take a great deal of bending to avoid the curve of the roof, which would also put too much curve into the platform floor. We changed the design to use two 25mm pipes for the inner cross-bars, giving an extra 13mm of clearance under the bar and meaning only a little bending was needed. It also gave a shorter span between cross-bars.
The final step was to tack weld all the joints and remove the now fully assembled platform for final welding. Of course with my still-developing welding skills, the final welding took a lot longer than expected.
Hang on!
It was then on to the brackets I needed for the awning – two extension brackets to supplement the mounting kit that came with the awning, and six receiver brackets, two for each side, plus two to fit in the garage to let me hang the awning out of the way when not in use. This also let me spread the awning out to dry if necessary. The extension brackets were made from recycled gate hinges, and lacking ready availability of solid bar to provide a spacer, each receiver bracket was made with a stack of three 25mm lengths of 25mm bar on each side as the spacer, then a 100mm length of the same bar across the top. Once assembled, I clamped it in a vice and cut a V-groove in each side of each stack, which I then filled with weld to bind everything together. I also welded two captive nuts onto each of the 100mm lengths, one to run a bolt through a hole in the awning bracket to stop it bouncing out of the slot, and the second to apply pressure to the awning bracket to stop it rattling.
On again, off-again
Ashley came back and spent a day helping me attach the receiving brackets to the side pipes, doing a trial fit of the roof platform and a trial fitting of the awning. I was very relieved that everything fitted perfectly.
Everything was then removed again for final welding of the receiving brackets. I also drilled and tapped a hole on each side of the bracket so that I could run a bolt all the way through the receiving brackets and the side pipes to provide the welds with some extra support. For a neater appearance I cut off the bolt head and welded the end of the bolt into the hole then ground everything smooth. Nothing had better come off now!
The next step was to fit the supports for the floor. The floor itself was nine mm H3 treated ply, so I fitted diagonal braces to each corner of the platform to bolt the corners of the ply to. I also fitted brackets in the middle front and rear to minimise the unsupported span. I deliberately left a five mm gap between the ply and the frame to avoid dirt accumulating between the two. I would have preferred to have set the 25mm cross-bars down nine mm to give a flush fitting for the ply, but that would have required more bending of the bars than I wanted and given the ply too much of a high spot in the middle.
Nearly there
Nearly at the end of the job now, I welded 50mm square patches to the ends of the side pipes and ground them back to give me waterproof caps, and as a final safety feature I drilled a 20mm hole through the rear cross rail and fittted a sleeve so that I could drop in a handle to provide a support when climbing up or down from the roof.
I was now finally on the home run of painting the metal and assembling and fitting the whole thing. The metalwork preparation consisted of a through wire brush with an angle grinder to give a satin finish for good paint adhesion, with a flapper wheel to remove any remaining weld splatter. The paint I used was a black hammer finish in a spray can as this could go into bare metal and gave a practical look.
It was then on to the ply floor. I cut this to a shape and put a slot in each end, clear of the mounting bracket, for tying the roof bag down. I also added cut-outs to give me working room when fitting the awning then painted it. For the top I used a very thick decking paint that provided a very rough, almost rubbery non-slip surface. As this was rather expensive, I used left-over low-sheen house paint for the bottom, really just for protection.
With everything finally ready to go onto the roof, I bolted the floor to the frame using round-head bolts to minimise the trip risk, and glued rubber strips made from an old inner tube to the underside of the ‘fingers’ and the locking bars to provide both cushioning and extra grip against the platform sliding on the rails. Finally it was time to invite Ashley and Gillian back for the ceremonial fitting of the platform and a celebratory dinner.
One last thing…
While I was very happy to have finally finished the job, I was a little sorry that the ply went over the centre bars, as that was not my original vision. This rapidly became more of a concern when I fitted my mud tyres for a trip, then needed to load the back of the car with every heavy piece of equipment I had to get it low enough to get out of the garage. While a full tank of fuel helped, it was time to solve the problem the right way.
I made up another eight corner braces and four support tabs and got Ashley back or a day to help remove the platform, take of the ply and cut it into three pieces, weld in all the additional supports and remount the ply. After some final painting, we managed to get the platform back on the car at the end of a very long day.
The platform now looks and feels flatter, has less wind noise, and best of all, is now below the roof rails – as per the original design. That final step has changed a good job into a very professional finish.
Of course a good project never ends, so in future articles I will cover the electrical work I am going to do to fit a full dual battery system, add more external lighting for camping, and move as much of the existing camping load as possible off the starting battery.